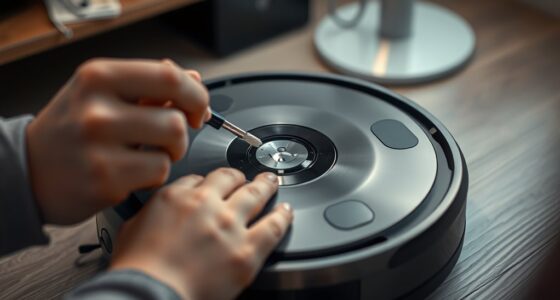
To clean your mapping robot’s laser housing, gently wipe the surface with a soft microfiber cloth to remove dust, smudges, and debris. Use a damp cloth with water or a mild, sensor-safe cleaner, avoiding harsh chemicals and abrasives. Pay special attention to the sensor areas and inspect regularly for damage or misalignment. Proper maintenance keeps sensors accurate and calibration reliable, helping your robot perform better. Keep going to discover more tips for ideal maintenance.
Key Takeaways
- Use a soft microfiber cloth dampened with water or mild, sensor-safe solutions to gently clean the housing surface.
- Carefully clean around sensor areas, ensuring no debris obstructs laser functions or calibration markers.
- Regularly inspect the housing for cracks, chips, or damage, and address issues promptly to prevent performance degradation.
- Perform sensor calibration checks after cleaning to maintain accurate mapping and navigation.
- Avoid harsh chemicals and abrasive tools to prevent surface damage and preserve the housing’s integrity.

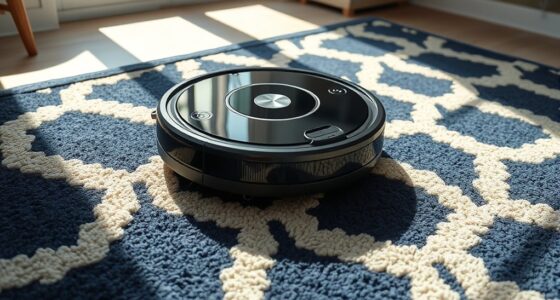
Regularly cleaning the laser housing on your mapping robot is essential to maintain accurate sensors and reliable navigation. Over time, dust, dirt, and smudges can accumulate on the housing surface, interfering with the laser’s ability to scan its environment precisely. When cleaning, you should pay close attention to sensor calibration, as even minor obstructions can cause misalignment or inaccurate readings. Proper maintenance ensures your robot’s laser sensor remains in optimal condition, providing accurate data for mapping and navigation tasks.
The material of the housing plays a crucial role in how you clean it. Most laser housings are made from durable plastics or composites designed to withstand regular cleaning, but they can still be scratched or damaged if not handled carefully. Using abrasive cleaners or rough cloths can harm the surface, leading to potential inaccuracies in sensor readings. Instead, opt for soft microfiber cloths or lint-free wipes to gently remove dust and smudges. When necessary, dampen the cloth slightly with water or a mild, sensor-safe cleaning solution. Avoid harsh chemicals that could degrade or discolor the housing material over time. Proper cleaning not only preserves the integrity of the housing but also prevents debris from blocking the laser, which could compromise sensor calibration.
Sensor calibration is critical after cleaning, especially if you’ve used any liquids or if the housing has been disturbed. Dirt or residue left on the lens or surrounding areas can cause the laser to misfire or produce false readings. To guarantee your sensor remains calibrated, it’s best to perform a calibration check after cleaning. Many mapping robots have built-in calibration routines, or you can perform a manual calibration process if needed. Consistently maintaining the cleanliness of the housing helps keep the laser aligned and functioning correctly, which is vital for accurate mapping results. Additionally, monitoring the sensor condition regularly can help identify when cleaning or adjustments are necessary to prevent performance issues.
In addition to cleaning, inspect the housing regularly for cracks, chips, or signs of wear. Damaged housing can expose internal components to dust and moisture, impairing sensor performance and calibration. When you notice any damage, replace or repair the housing promptly to prevent further issues. Proper handling and routine cleaning of the laser housing are simple steps that considerably extend your robot’s operational lifespan and maintain the quality of its mapping data. Proper handling and routine cleaning of the laser housing are simple steps that considerably extend your robot’s operational lifespan and maintain the quality of its mapping data. By paying attention to the housing material and ensuring the sensors are free of debris, you keep your mapping robot operating at peak performance, providing accurate, reliable navigation in any environment.
Frequently Asked Questions
How Often Should I Clean the Laser Housing?
You should clean the laser housing during regular sensor cleaning frequency, typically every few weeks or when you notice dust or debris buildup. Regular laser housing maintenance guarantees peak sensor performance. Keep an eye on environmental conditions; if your robot operates in dusty or dirty areas, increase cleaning frequency. Using a soft cloth and gentle cleaning solutions helps prevent damage. Consistent maintenance keeps your mapping robot functioning accurately and reliably.
What Cleaning Materials Are Safest for the Laser Housing?
When it comes to laser cleaning and housing maintenance, stick to soft, lint-free cloths and isopropyl alcohol (preferably 70%) to keep your laser housing safe. Stay away from abrasive cleaners or harsh chemicals that can damage sensitive components. Think of it as giving your robot a gentle spa day—gentle materials guarantee you don’t do more harm than good. Always power down before cleaning to avoid mishaps.
Can Cleaning Damage the Laser Sensor?
Cleaning can damage the laser sensor if you’re not careful, as improper cleaning risks scratching or misaligning the sensor. During laser sensor maintenance, avoid abrasive materials and harsh chemicals. Instead, use soft, lint-free cloths and approved cleaning solutions. Always follow manufacturer guidelines to minimize cleaning risks, ensuring your mapping robot’s laser stays accurate and functional. Proper care prevents costly repairs and maintains peak sensor performance over time.
Is There a Recommended Cleaning Process for Different Environments?
You should tailor your cleaning process based on environmental factors and cleaning frequency. In dusty or dirty environments, clean the laser housing more often using a soft, lint-free cloth and gentle cleaning solutions to prevent damage. For cleaner settings, reduce cleaning frequency, but always inspect regularly. Avoid harsh chemicals or abrasive materials, as they can harm the sensor. Regular, careful cleaning ensures peak performance without risking sensor damage.
How Do I Prevent Dust Buildup Inside the Laser Housing?
Think of your robot’s laser housing as a delicate lighthouse guiding your data journey. To prevent dust buildup and airflow disruption, regularly wipe the exterior with a soft, lint-free cloth and use compressed air to clear vents. Keep the environment clean and avoid introducing excess dust. This routine keeps your mapping robot’s vision crystal clear, ensuring it navigates smoothly without dust accumulation clouding its path.
Conclusion
Regularly cleaning the laser housing keeps your mapping robot precise and reliable. It’s easy to overlook, much like the dust that settles unnoticed, yet that small buildup can lead to big inaccuracies. Just as a clear lens reveals a true view, a clean housing guarantees perfect mapping. Remember, neglecting these simple steps might seem minor, but it can compromise your robot’s performance—reminding you that even the smallest details make the biggest difference.