TL;DR
Closet rigs work best when you treat reflection points, seal gaps, and place gear carefully. Moving noise out of your room often beats adding foam. Proper ventilation is key for safe, quiet, and effective DIY closet studios.
Ever tried recording vocals or podcasts in a tiny closet and ended up with a boxy, echoey mess? The truth is, a small space can be a goldmine for focused sound—if you treat it smartly. But most folks waste their time with endless foam panels, ignoring the real secrets. Here’s what actually makes a closet rig sound professional: placement, reflection control, and ventilation. If you want crisp, clear vocals without turning your room into an echo chamber, this guide is your shortcut.
We’ll cover why your ‘rig in the closet’ setup works, what common mistakes to avoid, and how simple tweaks can give you studio-quality sound without breaking the bank. Ready to turn that tiny space into a sound sanctuary? Let’s go.
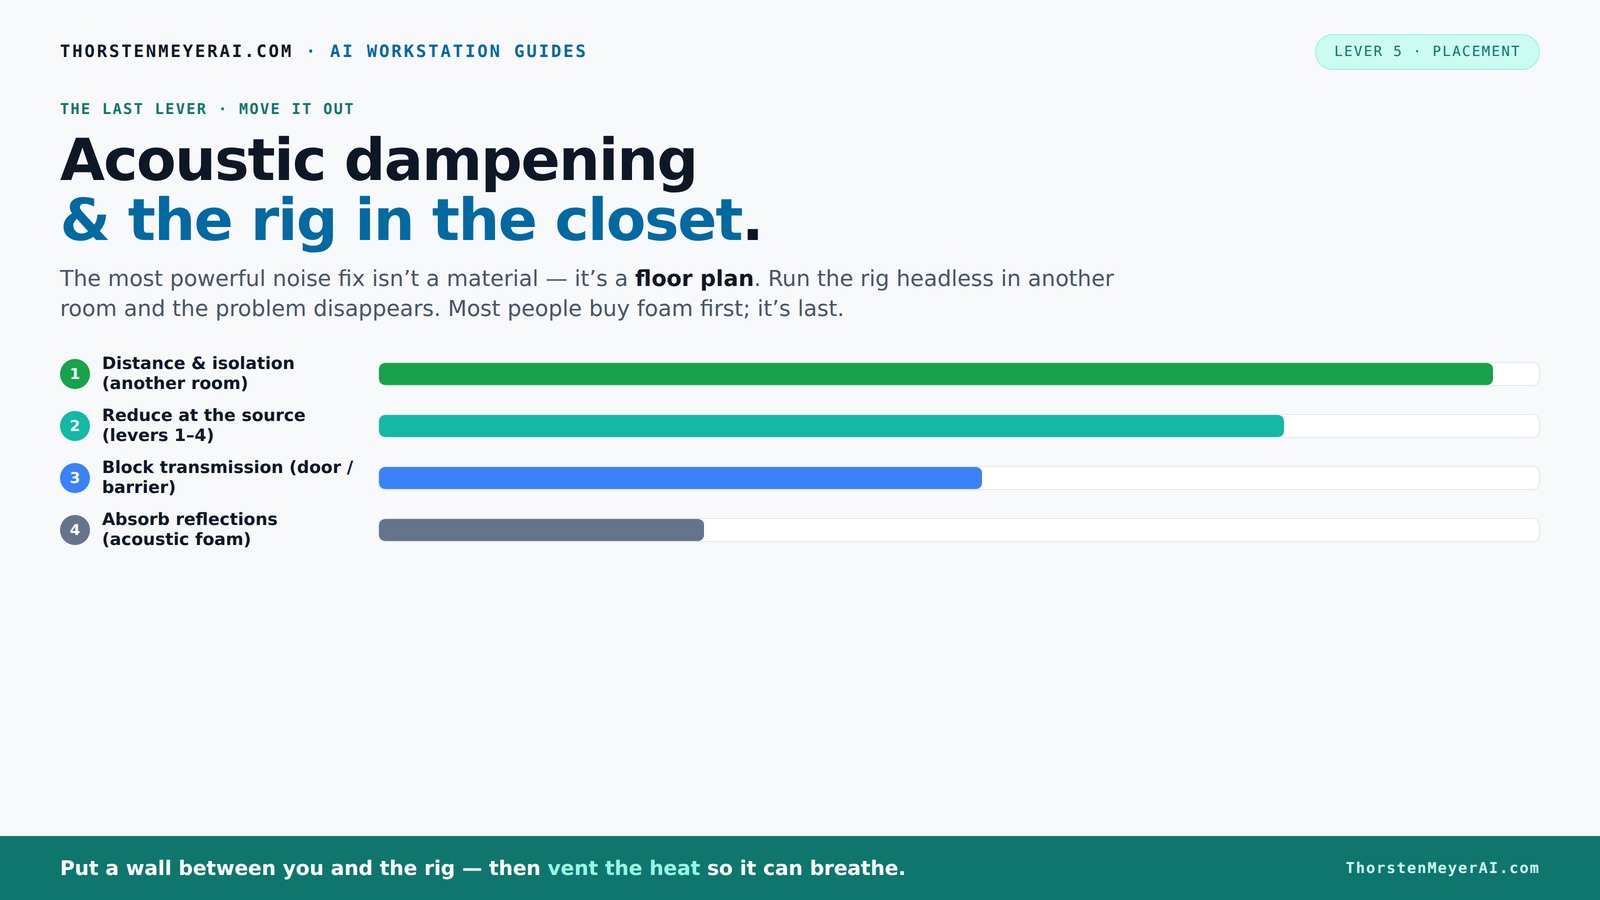
Acoustic dampening
& the rig in the closet.
The most powerful noise fix isn’t a material — it’s a floor plan. A rig you can’t hear because it’s in another room beats any amount of foam. Tap the approaches in Part 1 to see what actually works.
(another room)
(levers 1–4)
(door / barrier)
(acoustic foam)
Contain the noise, not the heat
Key Takeaways
- Treat the first reflection points near your mic and on hard surfaces for the biggest sound improvement.
- Sealing gaps around your closet door is essential—foam alone doesn’t stop sound leaks.
- Moving your rig into another room or closet can eliminate most noise issues, especially with good ventilation.
- DIY solutions like blankets and foam panels are effective and budget-friendly, especially when placed correctly.
- Proper ventilation prevents heat buildup, keeping your equipment safe and your sound clean.

Focusound 52 Pack Acoustic Foam Panels 1" x 12" x 12" Sound Proof Foam Panles Soundproofing Noise Cancelling Wedge Panels for Home Office Recoding Studio with 300PCS Double-Side Adhesive
Soundproofing - Acoustic foam panels triangular grooves structure for better noise absorption, helps to reduce and absorb unwanted...
As an affiliate, we earn on qualifying purchases.
As an affiliate, we earn on qualifying purchases.
Why Your Closet Can Be a Vocal Recording Powerhouse
Contrary to popular belief, small spaces like closets can produce warm, focused vocals. They minimize unwanted room reflections, giving your voice that intimate, studio sound. But it’s not about sealing yourself in; it’s about smart treatment and placement.
Imagine singing in a closet that’s lined with blankets and foam, with the mic aimed at the reflection points. You get a dry, rich tone with less echo—perfect for podcasts, voice-overs, and even singing. The key is knowing what to treat and where to position your gear for the best results.
60 Pack Acoustic Panel Polyurethane Foam Sound Proof Acoustic Treatment Room Kit for Absorbing Sound on Walls, 1" X 12" X 12" Sound-Proof Material for Home Studio Ceiling (60 Pack) (60PCS)
Quality Material - We choose to handcraft with fine fabrics of polyurethane foam to finish our acoustic panels...
As an affiliate, we earn on qualifying purchases.
As an affiliate, we earn on qualifying purchases.
Acoustic Dampening vs. Soundproofing: Here’s What You Need to Know
Acoustic dampening and soundproofing are often mixed up, but they serve different purposes. Dampening reduces echoes and reverb inside your space, making your recordings cleaner. Soundproofing, on the other hand, blocks sound from leaking out or in.
If you’re in a shared house or apartment, sealing gaps around the door with weatherstripping and adding blankets can cut down on noise escape. But if you want to stop your neighbors from hearing your singing, you’ll need a serious soundproof setup—massive barriers, drywall, or professional booths.
Understanding these differences is crucial because it influences your approach: dampening improves the sound quality within your room, while soundproofing affects how much sound escapes or enters. For most closet rigs, focusing on damping reflections near your mic and sealing gaps around the door strikes the right balance—improving sound quality without excessive effort or cost.

VEVOR Portable Vocal Booth, 6.56 ft Height, Portable Recording Studio with Travel Bag, Mobile Tablet Stand, Thickened Soundproofing, Sound Isolation Booth for Echo-Free Vocals, Podcasts, Voiceovers
Say Goodbye to Echoes: Built with durable Oxford cloth and acoustic padding, this recording booth for the home...
As an affiliate, we earn on qualifying purchases.
As an affiliate, we earn on qualifying purchases.
Where to Place Foam and Absorbers for Best Effect
Shoving foam panels in the corners or on the ceiling isn’t enough. Acoustic dampening works best when you treat the first reflection points—the spots where sound bounces directly from your mic to the surfaces around you. Think: the wall behind your mic, the side walls, and the ceiling right above.
By strategically placing foam at these reflection points, you prevent sound waves from bouncing back into your microphone, which reduces echo and muddiness. This targeted approach is more effective than covering every inch of wall. Additionally, bass traps placed in corners help tame low-frequency buildup, which can otherwise make recordings sound boomy or muddy. Remember, a small closet can turn into a focused sound chamber if you cover the right surfaces—covering the reflection points and key corners matters more than blanket coverage.

Audimute Soundproofing Acoustic Door Seal Kit - Door Sweep and Seal - (Large Size)
Includes (2) Door Seals (3/16" x 1/2" x 50') and (1) Door Sweep (1/2" x 1.5" x 25').
As an affiliate, we earn on qualifying purchases.
As an affiliate, we earn on qualifying purchases.
How to Prevent Sound Leaks Through the Closet Door
Closet doors are the biggest weak link in any DIY setup. Gaps around the frame, cracks, and the gap beneath the door let sound escape and unwanted noise in. The fix? Seal everything.
Use weatherstripping around the door frame, add a thick blanket or acoustic sealant, or hang a heavy curtain. For a more airtight solution, consider installing a door sweep or a soundproof blanket that blocks the gap at the bottom.
Blocking these leaks is essential because sound naturally escapes through gaps, reducing the effectiveness of your dampening efforts. When sound leaks out, it can cause your recordings to pick up background noise or feedback from other rooms. Sealing gaps not only enhances the room’s isolation but also makes your acoustic treatment more effective, saving you money and effort in the long run.
DIY Materials That Make a Big Difference Without Breaking the Bank
When building a closet booth, you don’t need fancy gear. Blankets, moving blankets, foam panels, and even thick rugs can do wonders. Tacky them to the walls or drape them over a curtain rod—easy to move or remove.
For example, a few blankets hung on the wall behind your mic can cut down harsh reflections. Foam panels are good too, especially if placed at the reflection points. And if you’re worried about low-end rumble, add bass traps in the corners.
Using these inexpensive materials allows you to customize your space without a big investment. The key is placement—target the reflection points and low-frequency buildup to get the most out of your DIY acoustic treatments. These methods are reversible and adaptable, so you can experiment until you find the perfect setup for your voice and space.
Placement & Gear: Positioning Your Microphone and Cables Smartly
Where you place your mic and how you route your cables makes a surprising difference. Keep the mic close to your mouth, about 6-12 inches, and position it so the first reflection points are treated. Directional mics (like a cardioid) help isolate your voice from reflections.
Run cables neatly, avoiding clutter that causes vibration and noise. Use braided or shielded cables to reduce electrical interference, especially in small, reflective spaces.
For example, if your closet has a shelf or a hook nearby, keep cables off hard surfaces to prevent noise from vibrations. Proper placement reduces unwanted noise and improves clarity.
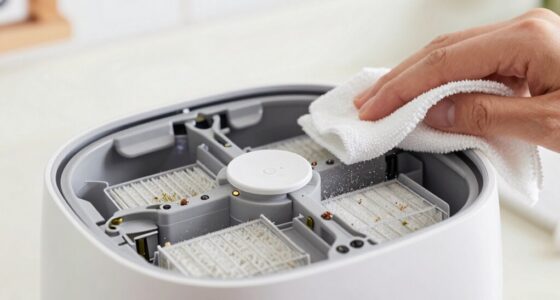
Ventilation: Keeping Your Closet Cool and Safe
Putting a hot, power-hungry rig in a closet isn’t just about sound—it's about safety. Trapped heat can cook your gear. The fix? Proper ventilation.
Install a quiet exhaust fan or create passive vents to let hot air escape. Use ducting if needed, and consider a thermostat-controlled fan to keep temperatures steady.
For example, a small duct with a 12V fan can pull heat out of the closet, preventing overheating. This keeps your rig running smoothly and quietly, without risking damage.
Learn more about reducing heat and noise in your AI workstation.Frequently Asked Questions
Is acoustic foam enough for a closet studio?
Not quite. Acoustic foam helps reduce echo and reflections, but it doesn’t block sound from leaking out or in. For proper isolation, seal gaps and treat reflection points. Foam alone is a good start but not the full solution.Where should I place foam or panels in a closet booth?
Place foam at the first reflection points—behind and beside your mic, on the ceiling, and on hard surfaces near your recording area. Bass traps in corners help with low frequencies, but broad coverage on walls makes the biggest difference.Do I need bass traps in a small vocal closet?
Yes, especially if you notice low-end buildup or a boomy sound. Bass traps in the corners help tame these frequencies, making your recordings clearer and more natural.How do I prevent sound from leaking through the closet door?
Use weatherstripping, acoustic sealant, or heavy blankets around the door frame. Adding a door sweep or hanging a thick curtain can also block gaps and reduce leaks. Sealing these gaps is vital because sound naturally escapes through openings, reducing your room’s acoustic isolation. Without proper sealing, your recordings may pick up background noise or feedback from adjacent spaces, defeating the purpose of your treatment efforts.What’s the best way to ventilate a closet rig without noise?
Use a quiet ducted exhaust fan with a thermostat control. Passive vents with a small, silent fan can also do the trick. Proper airflow is critical not only for comfort but for safety—overheating can damage your gear or affect performance. A well-ventilated closet prevents heat buildup, ensuring your equipment stays cool and your recordings remain clean. For example, installing a small duct with an inline fan that runs quietly can exhaust hot air without introducing noise into your recordings.Conclusion
In tiny spaces, placement and treatment matter more than fancy foam. Moving your rig into a closet or another room often beats trying to absorb every sound. Focus on reflection points, seal leaks, and keep your gear cool—your recordings will sound richer, clearer, and more professional.
So, next time you think about noise, remember: smart placement and simple DIY tweaks can turn your closet into a top-tier studio. Your voice deserves that crisp, studio-quality sound—without the hassle or expense.